
The era of .NET developers being constrained on using only Windows as a platform is gone. (At least for ASP.NET). That might be very cool to some, but also scary for others. Fear of change is true. Nevertheless, it’s definitely time (if not yet) to get out of the comfort zone and get your feet wet. Being able to work with .NET on Linux/Mac is one of the points that makes me agree 100% with Nick Craver that .NET Core is the future.
After reading Scott Hanselman’s blog post last week, I decided to setup WSL on my laptop. If you don’t know what Windows Subsystem for Linux is (WSL from now on in this post), I recommend reading this before.
The TL;DR of that link is:
WSL lets developers run Linux environments – including most command-line tools, utilities, and applications – directly on Windows, unmodified, without the overhead of a virtual machine.
While setting it up on my machine was very easy, I didn’t want to stay with the boring Windows bash shell. Guys at work use Mac’s with oh-my-zsh and boy that made me pretty jealous. It was not that straightforward to make it all work though. So hopefully, this post will help me and others in the future. Here’s what we are going to do:
- Enable WSL on Windows 10
- Install zsh + oh-my-zsh
- Configure zsh and oh-my-zsh
- Change Themes and colors
- Adding Bash on Ubuntu task in ConEmu*
Enable WSL on Windows 10
This is pretty straightforward to set up, Just follow the instructions here to get Ubuntu running. After you are in, update the packages, by running: sudo apt-get update. When all is working, you can continue to the next step.
Installing zsh
Open the Ubuntu app installed from the App Store. We will now install zsh:
sudo apt-get install zsh
After installing it, type zsh. zsh will ask you to choose some configuration. We will do this later on while installing oh-my-zsh, so choose option 0 to create the config file and prevent this message to show again.
Installing oh-my-zsh
Before all we need to have git installed:
sudo apt-get install git
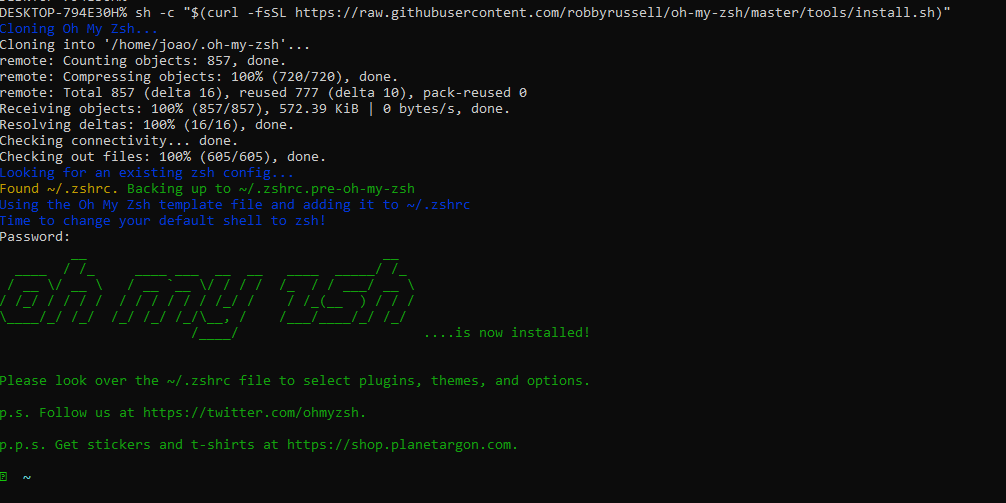
Then, use curl to install oh-my-zsh:
sh -c "$(curl -fsSL https://raw.githubusercontent.com/robbyrussell/oh-my-zsh/master/tools/install.sh)"
This will clone the repo and replace the existing ~/.zshrc with a template from oh-my-zsh.
Configuring zsh/oh-my-zsh
First, we need to make sure zsh is executed by default for Bash on Ubuntu. This is not mandatory, but if not done you need to type zsh every time. For this, edit the .bashrc file with nano: nano ~/.bashrc and paste this right after the first comments:
if test -t 1; then
exec zsh
fi
Save it Ctrl + shift X and restart your Ubuntu shell. You should be on zsh by default now.
Changing the Theme of oh-my-zsh
oh-my-zsh has several nice Themes. It’s worth checking them out. For this tutorial, I’m going to use the awesome agnoster.
Edit the ~/.zshrc again with nano: nano ~/.zshrc:
# Find and change this
ZSH_THEME="robbyrussell"

# To this
ZSH_THEME="agnoster"
Save it and restart your Ubuntu shell again.
Now was the tricky part while I was doing this on my laptop. After installing the theme, I got a totally broken shell (as shown in the image), with weird fonts and missing icons. That was expected due to missing Powerline Fonts, but even after installing them on Ubuntu the Theme was still broken. I tried several things and couldn’t make it work. Since we will run it with ConEmu, I didn’t want to spend more time on it. The Ubuntu shell is very limited anyway so.. not a big deal.
Installing missing Powerline Fonts
We need to install the Powerline fonts in our Windows to make the agnoster theme work. Follow these steps:
- Clone the powerline repository on Windows
git clone https://github.com/powerline/fonts.git
- Open an admin PowerShell, navigate to the root of the repo and run this:
.\install.ps1
This will install all the fonts on your Windows. You might get an error from PowerShell blocking you from running the script. Check this out if it happens with you. Make sure to reverse the policy after.
Changing directory colors
The directory colors for zsh is awful. If you followed along, by now you should have an ugly yellow or dark blue background on folders when ls/ll. Luckily, we can change that by installing a Solarized Color Theme from here. Follow these steps:
- Pick a theme from the GitHub repo (I’m using dircolors.ansi-dark since I use a dark shell).
- Download the file making sure to put it in the user’s home:
# using dircolors.ansi-dark
curl https://raw.githubusercontent.com/seebi/dircolors-solarized/master/dircolors.ansi-dark --output ~/.dircolors
- Edit your
~/.zshrcand paste this:
## set colors for LS_COLORS
eval `dircolors ~/.dircolors`
We have nice colors now :)
Setting Bash on Ubuntu task in ConEmu
Open ConEmu, and go to Settings. Navigate on the left-menu: Startup > Tasks. There, click at the + button at the bottom.
- Add a name for the task. Anything will suffice. I used
bash::ubuntuto group Ubuntu into the bash tasks. - On
Task parameterschoose an icon for the task. I picked the Ubuntu icon app that is buried under some very long path. but any .ico will work. You can leave it blank if you don’t care. - For the
commanduse this%windir%\system32\bash.exe ~ -cur_console:p. This will start bash under the user home directory. Since we already configuredzshto run by default, this is enough.
Open the new task on ConEmu and… Voalá!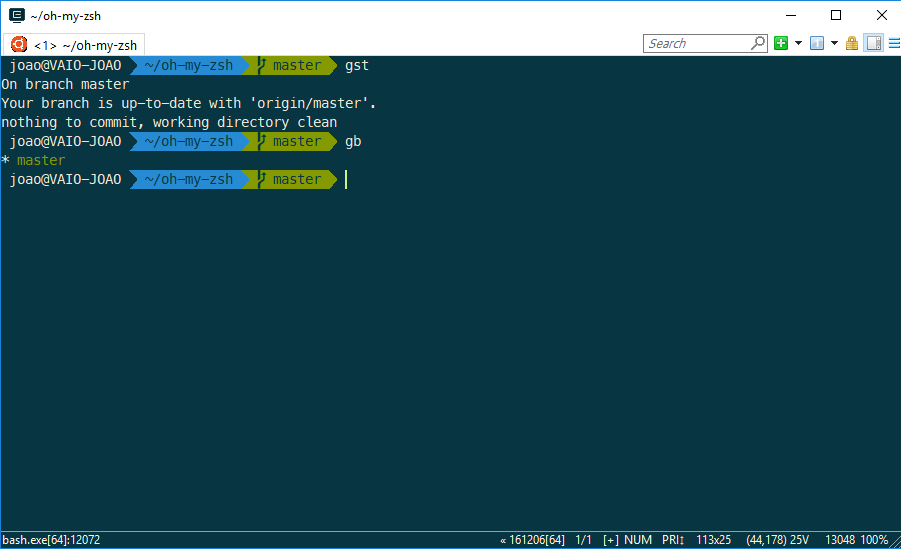
Nice command look, lots of git shortcuts and much more productivity. Couldn’t enjoy this more.
Additional links
Here are a few other things you might want to look:
- oh-my-zsh cheatsheet: Lots of commands to improve your productivity
- Colors page on ConEmu: How to change ConEmu color scheme (If you liked mine, I’m using Solarized (Luke Maciak) with Meslo LG M DZ for Powerline console font)
- Understand why you’re not supposed to touch Linux files using Windows apps: https://blogs.msdn.microsoft.com/commandline/2016/11/17/do-not-change-linux-files-using-windows-apps-and-tools/
Would be cool to see what other things you use on your setup. Just let me know in the comments!