TL;DR:
If you are already familiar with Azure Key Vault, App Service/Functions and just want to know how to use the new Key Vault references feature in your app, you can just jump to this section: Create a system-assigned identity for our Function and follow from there.
ASP.NET Core + Configuration
By now, it’s not big news that ASP.NET Core is the future of web development with .NET. Of all the great additions that ASP.NET Core has introduced, one of my favorites is everything around Configuration.
Configuration is easy and practical — configuring our apps in ASP.NET Core feels natural. I could spend this entire blog post just talking about why I think it’s so great, but let’s leave it for maybe another post. :)
One thing missing from Configuration is a way to “secure” the settings. If you use Azure App Service, the settings and connection strings are stored encrypted in Azure, and they are decrypted only before being injected into your app’s process memory when the app starts, as explained here.
This is all great, but one could argue that the settings values are still visible in plain text in the Configurations page on the App Service, and anyone who can access your App Service could potentially see the values. As a practical person, I argue back that if someone you don’t trust has access to your App Service configurations page, then you probably have more serious issues. 🤷
Still, let’s say you trust no one and you want to have more control over the settings which contain sensitive values in your App Service / Function app settings. Imagine settings like API Keys, external services secrets and so on. How can we achieve a more fine grained control over our settings? Enter Azure Key Vault.
Azure Key Vault - What is it?
The official definition by Microsoft:
Azure Key Vault is a tool for securely storing and accessing secrets. A secret is anything that you want to tightly control access to, such as API keys, passwords, or certificates. A vault is logical group of secrets.
In essence, we can think of Azure Key vault as, well a Vault! You put your secret things in, and the vault keeps them secure. Of course, Azure Key Vault is more complex than that and offers many features, but for the scope of this post, I’d say that’s enough to understand. Feel free to dig more into the details in case you are interested: What is Azure Key Vault?
Using Azure Key Vault with your ASP.NET Core apps
If you want to use Azure Key Vault as one of your app’s configuration providers you would need to do some work, like add specific NuGet packages, get the URL of the Vault, create your clientId and secret (more on resolve this chicken-or-egg issue with Azure system-assigned identity later), connect to the vault, read the settings… you get the idea.
The point is: the process isn’t trivial. I had to go through these steps recently, and I spent more time on it than I’m proud to share. Several Microsoft docs and blog posts later, I managed to change my app to make it work. BUT, not everyone out there can change their apps that easily. We need to consider the number of people running critical components in production. Requiring such code changes just for the sake of consuming settings from the Key Vault seems a bit too much to ask.
As you maybe guessed at this point, there’s an easier way (if you are using App Service/Azure Functions at least): Azure Key Vault references. 🔐
Azure Key Vault references
With Key Vault references you can reference your secrets from the Key Vault directly in your normal app settings, be it either an app hosted on App Service or an Azure Function. So, your app can just work as it normally would. You don’t need to change code to be able to use settings that are stored in the Key Vault!
I should point out that at the time of writing this blog post, this feature is in public preview and only works for App Service and Azure Functions. I suspect that the syntax will not change that much, but we all know that preview is preview and not suitable to use in production.
Update (Dec 2019): Things moved and Key Vault references is out of preview and can be used now in prod apps!
Now that we know the theory behind Key Vault references and understand the issue it tries to solve, let’s see how we can actually use this thing in combination with an Azure Function! ⚡
Steps of our demo
- Create a Key Vault on Azure
- Add a new secret “setting” into our vault
- Get the “reference” of our secret
- Create a new Azure Function App on Azure
- Create an HTTP Function and deploy to Azure
- Create a system-assigned identity for our Function
- Configure the access policy in our Key Vault for our Function (GET only)
- Use the Key Vault reference as the source of our Function setting
Eight steps seem like a lot, but it’s not that complicated. I will try to guide you and explain each step in more detail, so you are not just blindly following me.
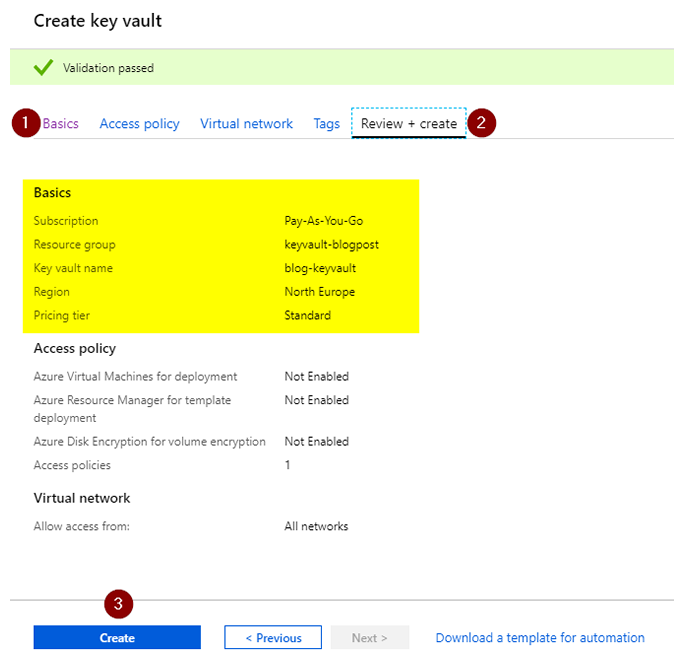
Creating the Key Vault
On the Azure Portal, go to Resource groups > _your resource group_ > Add new resource > Key Vault > Create.
- Fill in the basic details: Name, Region and pricing tier
- You can skip the other tabs for now. We will come back to
Access policylater - Review the things and finally click on
Create.
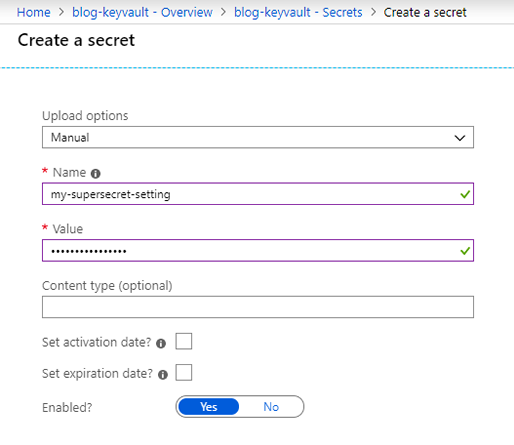
Adding a secret to our Key Vault
Navigate to your Key Vault when the deployment finishes. Once inside the Key Vault page, look at the left menu and click: Secrets > Generate/Import. Enter whatever value you want for your secret and hit the Create button. The page looks like this:
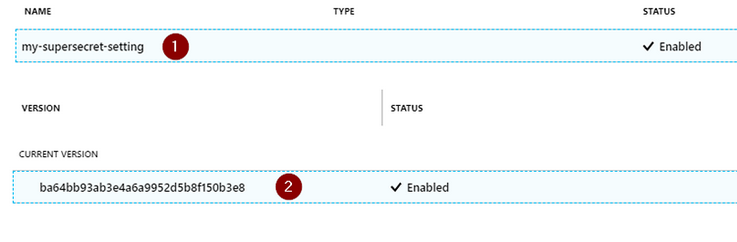
Get the “reference” of our secret
After the secret is created, you are redirected to the list of secrets. Click on the secret you just created. The next page shows the versions of that secret. I will not go into details about this, but a secret can have multiple versions in the Key Vault. We only have one version, so click on that. The steps look more or less like this:
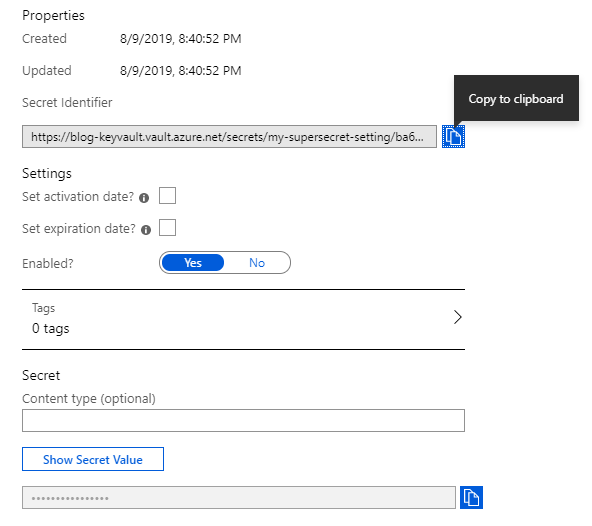
Once inside the details of that version of the secret, you’ll see the Secret Identifier (it’s just a URL). That’s the identifier we will be using later. Azure nicely offers to copy it to the clipboard for us. So, copy it and store it somewhere.
Create a new Azure Function App
Go to your resource group and add a new resource. Choose Function App. Just fill in the details, and make sure to select .NET Core for runtime stack.
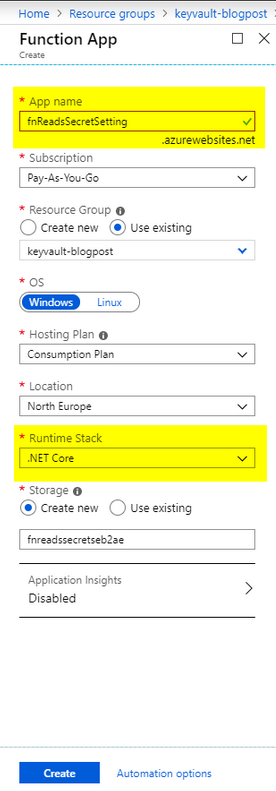
Now we have our Function App created on Azure. A Function App is not the function (code) itself, but more of an aggregator of actual functions. This is nice because it makes deployment, management and resource sharing easier.
Create an HTTP Function (v2)
On the Function App page, click on Get publish profile and save it somewhere on your computer. To make this short, we’ll be deploying our Function via Visual Studio, but, for the sake of mankind, don’t do this for real apps!. This is just a demo.
Continuing, I’ll create an HTTP Function v2 with .NET Core 2.2. I’ll be using VS 2019 as my IDE, but you can create it with VSCode or VS 2017 as well. You can follow the official docs here on how to create yours: Create your first function OR you could just create the function directly in the Portal for brevity (and avoid having to deploy). Create your first function in the Azure portal
Whichever way you have chosen to create your function, here is the code for it:
using System.Threading.Tasks;
using Microsoft.AspNetCore.Mvc;
using Microsoft.Azure.WebJobs;
using Microsoft.Azure.WebJobs.Extensions.Http;
using Microsoft.AspNetCore.Http;
using Microsoft.Extensions.Logging;
using Microsoft.Extensions.Configuration;

namespace FnReadSecretFromVault
{
    public static class Function1
    {
        [FunctionName("Function1")]
        public static async Task<IActionResult> Run(
            [HttpTrigger(AuthorizationLevel.Function, "get", Route = null)] HttpRequest req,
            ExecutionContext context)
        {
            // Set up the configuration builder, the same as in an ASP.NET Core App
            var config = new ConfigurationBuilder()
                .SetBasePath(context.FunctionAppDirectory)
                .AddJsonFile("local.settings.json", optional: true, reloadOnChange: true)
                .AddEnvironmentVariables()
                .Build();

            // Access our secret setting, normally as any other setting
            var secretSetting = config["MySecretSetting"];

            return new OkObjectResult(secretSetting);
        }
    }
}
The only thing it does is: Grab the configuration, access the value of our secret setting and return it.
If you are not familiar with how settings work in App Service or Azure Functions: the settings configured in the Azure portal are available as environment variables into our apps. So the call to
AddEnvironmentVariablesmakes sure our app has them loaded as one of our providers.
Another thing to note is the local.settings.json file:
{
  "IsEncrypted": false,
  "Values": {
    "AzureWebJobsStorage": "",
    "FUNCTIONS_WORKER_RUNTIME": "dotnet"
  },
  "MySecretSetting": "Local-Value"
}
See the MySecretSetting entry there? It holds a local value. If we run the function on our machines, it will return Local-value, as we would expect. Pretty straightforward. Let’s now deploy this function to Azure.
Deploying the function to Azure
Remember that we downloaded the publish profile before? Now it’s time to use it. Again, you don’t need to use Visual Studio for this (and please don’t!), but, for the sake of brevity, this is what I’m going to use. There are plenty of tutorials on how to deploy it via PowerShell, Git, Azure Pipelines, and so on.
On Visual Studio:
- Right-click on the Function project >
Publish - In the window click on
Import Profile... - Once it’s imported, hit
Publish - Done!
If we would test our function now, it would run fine, but it wouldn’t return anything. Why? Because the local.settings.json file is meant to be used only during development. To be able to access the MySecretSetting from our function when it’s running on Azure, we have to add this setting there. The image below shows how to access the Function settings page:
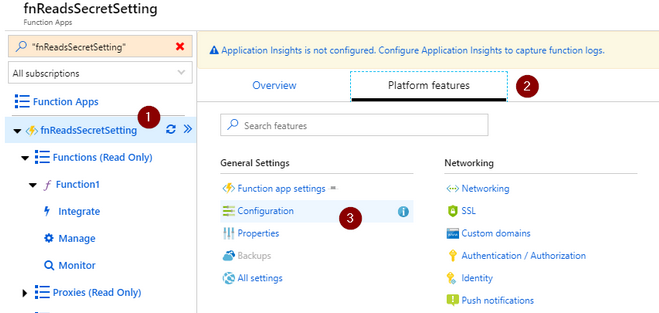
In the application settings page, click on New application setting and enter the same key as we have on the local file: MySecretSetting, with a value like: Azure-Value.
Now we can test our new Function! Go back to the main page and follow the steps on the image (you can open the image in a new tab to see it better).
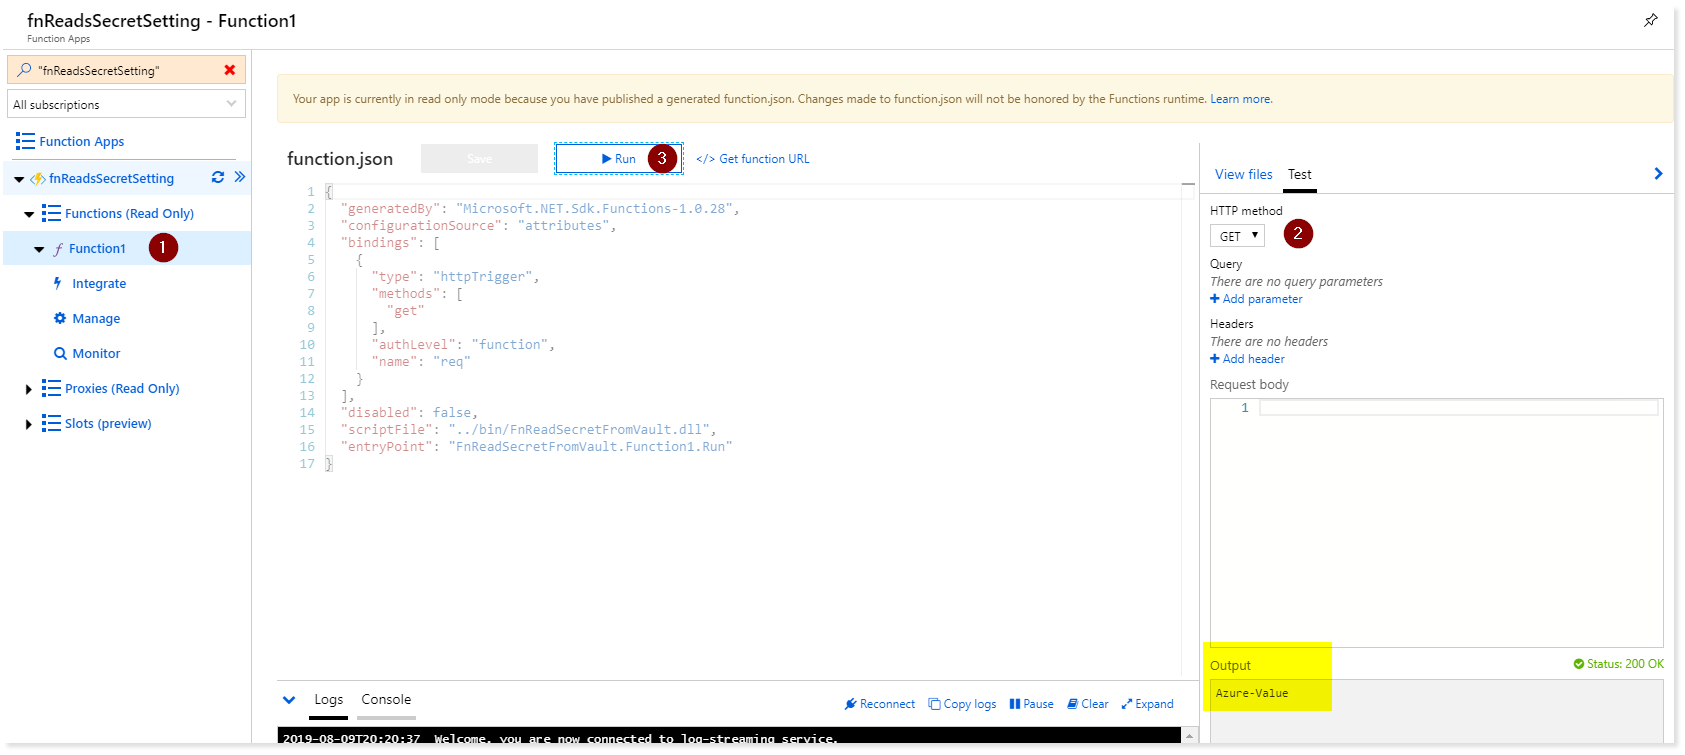
Our Function now returns: Azure-Value! But it’s still not what we want. Let’s continue and change it to return the value stored in the Key Vault, using references.
Creating a system-assigned identity for our Function
To be able to consume the secrets from the Key Vault, our Function needs to have access to it. In Azure, you can configure one resource to access another by creating what’s called a managed identity. Once your resource has a managed identity, you can modify another resource and allow access to it. Maybe my explanation sucks, so here are the official words:
A managed identity from Azure Active Directory allows your app to easily access other AAD-protected resources such as Azure Key Vault. The identity is managed by the Azure platform and does not require you to provision or rotate any secrets.
This also solves the Chicken or the egg issue where you have to have the Key Vault user and password in your settings before you’re able to connect to it.
Let’s add a managed identity for our Function App:
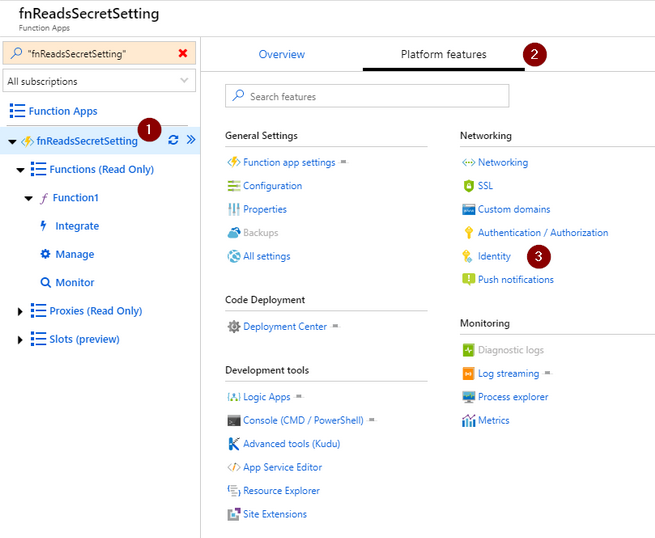
On the new page, make sure the tab System assigned is selected. Then, toggle the Status to On and press Save. That’s it. Wait until Azure finishes configuring everything to move to the next step.
Configuring the access policy on the Key Vault for our Function
One of the nices thing about Azure Key Vault revolves around its access policy feature. The granularity is huge so we can achieve a lot of things by creating several policies with different access levels. In our case, we’re going to keep it simple and allow only GET access to secrets to our Function.
The previous step was important because now we can search for our managed identity and configure its access to the Vault. To do this, go back now to our Key Vault page, and on the left menu click on Access policies.
Once in the Access policies page, click on Add access policy. Select Get for the Secret permissions field. Next, click on the Select principal field. A side-bar will appear on the right side of the screen. There you need to search for our managed identity. If you followed along, the name of it is fnReadsSecretSetting which matches the name used for our Function App initially. Click Select on the window. It should look like this at the end:
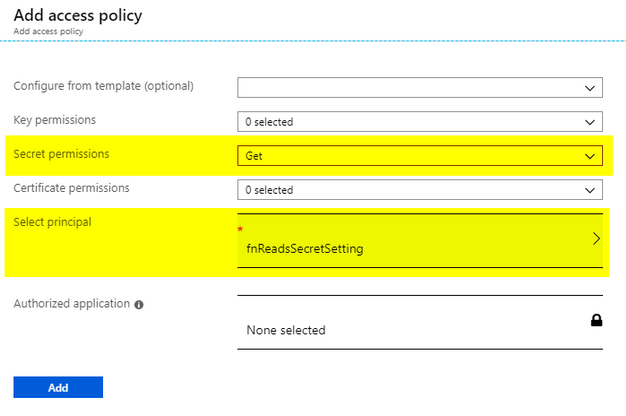
Now our Function App has GET access to Secrets in the Vault 👌. The only thing missing now is using the Key Vault references feature, which will allow us to reference the secret in the vault as one of our Function settings. Let’s move on.
Using the Key Vault reference as the source of our Function setting
Now that we have the Key Vault configured to allow access to our Function, let’s do what we came for (finally!). Remember I told you to copy the secret identifier when we first created the secret in our Key Vault? We are going to use it now. If you lost it or haven’t copied it yet, don’t worry. Just go back to your Key Vault > Secrets > Then follow again the instructions on the step: Get the “reference” of our secret.
The way the Key Vault references feature work is: It has a special syntax which will contain the secret identifier inside. This is how the syntax looks like:
@Microsoft.KeyVault(SecretUri=<YOUR_SECRET_IDENTIFIER_HERE>)
What you need to do is: Replace the YOUR_SECRET_IDENTIFIER_HERE in the code above with the Secret URI/Identifier we copied from our Key Vault. With our secret reference built, we can head back to our Function Settings (fnReadsSecretSetting > Platform features > Configuration)
Just edit the MySecretSetting in our Function settings, and paste the reference. Click Ok and make sure to save it!

Finally, we can invoke our Function and, you should see the value to be the one you entered in your Key Vault!.
It might seem like a lot, but let’s take a step back for a second. Imagine that your app is already in production (Function or App Service) and, with just a few clicks, we were able to reference a setting value which is securely stored and managed by Azure Key Vault, without any code change. Awesome, isn’t it?
Limitations:
Here are some limitations that you may or may not care:
As of it now, you have to use the whole secret URL, with the version at the end. This isn’t great, because if you change the secret, the AppService/Function will not use the new value. It seems they are working on to support not having to have the version, but there’s no ETA.
The Key Vault references is still in preview, so use it with care. According to this comment the GA might be comming soon. You can also vote and subscribe to this so you are notified when it’s available for production.
Good to know
The access to the key vault is priced by transactions. For secrets, the current pricing page shows secrets operations: €0.026/10,000 transactions.
Well, that looks pretty cheap. But still, I wouldn’t like to have a surprise at some point after starting using it. The first thing I was curious was: While using Key Vault references, does it count as a transaction for every time I read the setting which holds the reference value?. Turns out someone already asked it over on GitHub and the response was:
The settings/values are pulled from KeyVault once the app service process starts […]
Here is the link for the whole discussion: KeyVault references - are returned values cached in the App Service
Automation
I demonstrated here in this post how to configure Key Vault references in your AppService or Function. Along with the post, I created several resources and changed configurations, all via the Azure Portal. It’s okay to do it like that a few times, but as soon as you need to scale your services you have to start thinking about how to automate the deployment of it. Most of the things I showed here, you can do via the Azure CLI. In case you are interested, the links below have more details on this.
References/links
It’s not possible to cover all the things in a single blog post. If I got you curious/interested, you can go into more details using the links below.
Announcement of Key Vault References: https://azure.microsoft.com/en-us/blog/simplifying-security-for-serverless-and-web-apps-with-azure-functions-and-app-service/
Key Vault references docs: https://docs.microsoft.com/en-us/azure/app-service/app-service-key-vault-references
Managed identities using Azure CLI: https://docs.microsoft.com/en-us/azure/app-service/overview-managed-identity#using-the-azure-cli
CLI samples for Azure App Service: https://docs.microsoft.com/en-us/azure/app-service/samples-cli
Key Vault docs: https://docs.microsoft.com/en-us/azure/key-vault/
And that’s about it. Thanks for reading it and I hope it was somewhat usefull. Feel free to leave a comment if you have any questions.