
This is the third post in the Authorization in ASP.NET Core series.
Part 1: Using a middleware to build a permission-based identity in ASP.NET Core
Part 2: Deep dive into policy-based authorization in ASP.NET Core
Part 3: Protecting your API endpoints with dynamic policies in ASP.NET Core (this post)
Part 4: Adding integration tests for permission-protected API endpoints in ASP.NET Core
In this post, we’ll come full circle. I’ll show you how to put everything together and start authorizing API endpoints with permissions.
TL;DR
In this post, I demonstrated how to authorize API endpoints simply by doing this: [PermissionAuthorize(Permissions.Read)]. Behind the scenes, everything works by leveraging dynamic policies via a custom IAuthorizationPolicyProvider.
Jump to the What do we need section to see the breakdown. If you still don’t feel like reading, check the branch for this post on GitHub.
Policies recap
In the last post, we learned that everything in ASP.NET Core authorization revolves around policies. I showed some examples of Role-based and Claims-based/Policy authorization and how those are backed by policies.
Although both options offer a great start in adding basic authorization to your APIs, they come with their set of limitations.
To me, the biggest limitation is that you have to register them before-hand, during the call to AddAuthorization.
Let’s say you have CRUD permissions in your system (like we saw in the first post). If you stick to the “classic” policies, you would need to do this:
// Startup.cs
services.AddAuthorization(options =>
{
    options.AddPolicy("Create", policy => policy.RequireAssertion(context =>
        context.User.HasClaim(c => c.Type == "permissions" && c.Value == "Create")));

    options.AddPolicy("Read", policy => policy.RequireAssertion(context =>
        context.User.HasClaim(c => c.Type == "permissions" && c.Value == "Read")));

    options.AddPolicy("Update", policy => policy.RequireAssertion(context =>
        context.User.HasClaim(c => c.Type == "permissions" && c.Value == "Update")));

    options.AddPolicy("Delete", policy => policy.RequireAssertion(context =>
        context.User.HasClaim(c => c.Type == "permissions" && c.Value == "Delete")));
})

// controller
[HttpPost]
[Authorize(Policy = "Create")] // use our policy here
public IActionResult Create()
{
    return Ok("Something was created");
}
Since you have to define them statically, that certainly will not scale well. Imagine if you have 100 policies? All that code there.. not great right?
The official docs highlight some good reasons why they might not be enough for you:
- Using an external service to provide policy evaluation.
- Using a large range of policies (for different room numbers or ages, for example), so it doesn’t make sense to add each individual authorization policy with an AuthorizationOptions.AddPolicy call.
- Creating policies at runtime based on information in an external data source (like a database) or determining authorization requirements dynamically through another mechanism. https://docs.microsoft.com/en-us/aspnet/core/security/authorization/iauthorizationpolicyprovider?view=aspnetcore-5.0
Point 1 above could be very likely to happen in a “real-world” app. Often we need to contact a database or another service to evaluate the permission, and with the classic approach, that is not possible.
Thankfully, the authorization architecture in ASP.NET Core is flexible enough and can accommodate more complex scenarios. But before we start, I want to give you an overview of what do we want to achieve in the end with all of this.
What do we want to achieve
Before I start talking about how to solve the problem, let’s see first what is the ultimate goal. I believe thinking about the requirements will help you understand better where we are going with this.
Let’s continue with the CRUD example. What I would like (and I imagine you too) is:
Devs are used to the
[Authorize]attribute. So I want to use that in my endpoints, telling it which permission is required.Have the option to pass multiple permissions, and specify
ORorAND(requiring both, or any).Not need to define them beforehand. They should be created automagically. ✨
Like so:
[PermissionAuthorize(PermissionOperator.Or, Permissions.Create, Permissions.Update)]
[HttpPost]
public IActionResult Create()
{
    return Ok("I'm such a creator!");
}
I know, looks cool right? Let’s see how we can do that next. 😎
What do we need
To achieve what we want, we need to create policies “on-the-fly”. Remember, in the end, we always need one.
In the previous post, I showed you all about Requirements, Policies and Authorization Handlers. We’ll need all of those now to achieve this.
If you did not read the previous post, I recommend you do so now before continuing. The rest of the post assumes that you have some understanding of the individual pieces.
Let’s start with the easiest: Requirements.
Requirements
Our example above had two things: Operator and Permission(s).
[PermissionAuthorize(PermissionOperator.Or, Permissions.Create, Permissions.Update)]
[PermissionAuthorize(PermissionOperator.Or, Permissions.Create, Permissions.Update)]
The requirement is the type that will contain such data. Later on, it gets injected into the handler, which uses it to decide things.
Our requirement looks like this:
using System;
using Microsoft.AspNetCore.Authorization;

namespace AuthUtils.PolicyProvider
{
    public class PermissionRequirement : IAuthorizationRequirement
    {
        public static string ClaimType => AppClaimTypes.Permissions;

        // 1 - The operator
        public PermissionOperator PermissionOperator { get; }

        // 2 - The list of permissions passed
        public string[] Permissions { get; }

        public PermissionRequirement(
            PermissionOperator permissionOperator, string[] permissions)
        {
            if (permissions.Length == 0)
                throw new ArgumentException("At least one permission is required.", nameof(permissions));

            PermissionOperator = permissionOperator;
            Permissions = permissions;
        }
    }
}
Requirements must implement the IAuthorizationRequirement marker interface. You can pass data to it, just like I did above. In this case, we need 1 - the operator and 2 - the list of permissions. We also have the ClaimType which is always permissions.
Authorization Handlers
Authorization Handlers are types that are responsible for evaluating requirements and ultimately “marking” them as Succeed or Fail. Handlers can “handle” one or more requirements.
For our case, it’s enough that our handler only deals with our PermissionRequirement. Because of that, we need to inherit from the generic abstract class AuthorizationHandler<T>, where T is the requirement type.
Here are some facts about them:
If inheriting from the base
AuthorizationHandler<T>class, the handler needs to override theHandleRequirementAsyncmethod. This method receives two parameters: anAuthorizationHandlerContextand the instance of the requirement, in this case, ourPermissionRequirement.Handlers don’t need to return anything. If the logic tells that the user has permission, we need to call
context.Succeed(requirement). That is the only thing necessary to authorize the request.Optionally, you can also call
context.Fail()to ensure failure. Calling it will ensure that the request is not authorized, even if other handlers callcontext.Succeed.You can inject DI services into handlers! That is super useful because, for example, you can inject your
DbContextand get data to help in your authorization logic.
Check the docs for learning more about having multiple handlers and what a handler should return
Enough talking. The handler for our PermissionRequirement looks like this:
using System.Threading.Tasks;
using Microsoft.AspNetCore.Authorization;

namespace AuthUtils.PolicyProvider
{
    public class PermissionHandler : AuthorizationHandler<PermissionRequirement>
    {
        protected override Task HandleRequirementAsync(
            AuthorizationHandlerContext context, PermissionRequirement requirement)
        {
            if (requirement.PermissionOperator == PermissionOperator.And)
            {
                foreach (var permission in requirement.Permissions)
                {
                    if (!context.User.
                        HasClaim(PermissionRequirement.ClaimType, permission))
                    {
                        // If the user lacks ANY of the required permissions
                        // we mark it as failed.
                        context.Fail();
                        return Task.CompletedTask;
                    }
                }

                // identity has all required permissions
                context.Succeed(requirement);
                return Task.CompletedTask;
            }

            foreach (var permission in requirement.Permissions)
            {
                if (context.User.HasClaim(PermissionRequirement.ClaimType, permission))
                {
                    // In the OR case, as soon as we found a matching permission
                    // we can already mark it as Succeed
                    context.Succeed(requirement);
                    return Task.CompletedTask;
                }
            }

            // identity does not have any of the required permissions
            context.Fail();
            return Task.CompletedTask;
        }
    }
}
We receive an instance of a PermissionRequirement and then it’s just looking if the logged-in user has the proper permissions. If we see the user has them, we call context.Succeed(requirement);. If not, we want to ensure it fails, so we call context.Fail();.
I want to emphasize that here is where your main authorization logic lives.
I used
context.Fail()because I want to be absolutely sure that if the user does not have the required permissions, the request should not be authorized.
Let’s look at the Authorize attribute next.
Authorize attribute
Now we have the requirement and the handler. Those two comprise the “business logic” side of authorization.
Now comes what I call “plumbing code”, starting first with our custom authorize attribute.
At a high level, the custom attribute serves two purposes. To receive the permissions and to annotate the endpoint. (Metadata)
Here’s how it looks:
using System;
using Microsoft.AspNetCore.Authorization;

namespace AuthUtils.PolicyProvider
{
    public enum PermissionOperator
    {
        And = 1, Or = 2
    }

    public class PermissionAuthorizeAttribute : AuthorizeAttribute
    {
        internal const string PolicyPrefix = "PERMISSION_";
        private const string Separator = "_";

        public PermissionAuthorizeAttribute(
            PermissionOperator permissionOperator, params string[] permissions)
        {
            // E.g: PERMISSION_1_Create_Update..
            Policy = $"{PolicyPrefix}{(int)permissionOperator}{Separator}{string.Join(Separator, permissions)}";
        }

        public PermissionAuthorizeAttribute(string permission)
        {
            // E.g: PERMISSION_1_Create..
            Policy = $"{PolicyPrefix}{(int)PermissionOperator.And}{Separator}{permission}";
        }

        public static PermissionOperator GetOperatorFromPolicy(string policyName)
        {
            var @operator = int.Parse(policyName.AsSpan(PolicyPrefix.Length, 1));
            return (PermissionOperator)@operator;
        }

        public static string[] GetPermissionsFromPolicy(string policyName)
        {
            return policyName.Substring(PolicyPrefix.Length + 2)
                .Split(new[] {Separator}, StringSplitOptions.RemoveEmptyEntries);
        }
    }
}
That is a lot of code. Let’s make some sense of it:
1 - We have an enum which is a nice way to pass AND or OR as the operator.
2 - We inherit from the traditional AuthorizeAttribute.
3 - Next, you can see two internal strings PolicyPrefix and Separator. Hold them in your mind for a sec.
4 - Then we have our constructors. One receives the operator + permissions. The other just one permission.
With this custom attribute we can do this:
// multiple permissions
[PermissionAuthorize(PermissionOperator.Or, Permissions.Create, Permissions.Update)]

// single permission
[PermissionAuthorize("Create")]
Notice that in the ctor, we set a property called Policy. This comes from the base class and it’s crucial that we set it. Policies must have a name. Remember the example from before:
// Startup.cs
services.AddAuthorization(options =>
{
    // Will set the Policy = 'Create'
    options.AddPolicy("Create", policy => policy.RequireAssertion(context =>
        context.User.HasClaim(c => c.Type == "permissions" && c.Value == "Create")));
})

// controller
[HttpPost]
[Authorize(Policy = "Create")] // we use the policy name here
public IActionResult Create()
{
    return Ok("Something was created");
}
Since we don’t want to define our policies statically, our policy name needs to be “dynamic”.
Here you can decide what makes sense to you, but what I did is <prefix><operator><separator><permissions>. In the end, the Policy property evaluates to something like:
// Policy = PERMISSION_2_Create_Update
[PermissionAuthorize(PermissionOperator.Or, Permissions.Create, Permissions.Update)]

// Policy = PERMISSION_1_Create
[PermissionAuthorize("Create")]
This will be crucial in the last part of the puzzle, our policy provider. Speaking of which…
Policy Provider
Let’s review a bit:
We have the
PermissionRequirementwhich is where we have the permission(s) and/or operator.We have the
PermissionHandlerwhich is where we receive our requirement instance and do our authz logicWe have the
PermissionAuthorizeAttributewhich is what we use to annotate our endpoints with the proper permissions
You might be wondering now: Where is the PermissionRequirement created? I pass the permissions to our PermissionAuthorizeAttribute which, becomes a glorified string, and that’s it. I’m not getting it..? 🤔
The answer to that is this: IAuthorizationPolicyProvider.
ASP.NET Core ships with one implementation of the IAuthorizationPolicyProvider interface : DefaultAuthorizationPolicyProvider.
The job of the DefaultAuthorizationPolicyProvider is to provide policies to the authorization framework. If we take a look at the default implementation, it has a method called GetPolicyAsync with the following code:
public virtual Task<AuthorizationPolicy?> GetPolicyAsync(string policyName)
{
    // MVC caches policies specifically for this class, so this method MUST return the same policy per
    // policyName for every request or it could allow undesired access. It also must return synchronously.
    // A change to either of these behaviors would require shipping a patch of MVC as well.
    return Task.FromResult(_options.GetPolicy(policyName));
}
See the policyName param? That is where the Policy string we built before comes to use. In the default implementation, the method tries to find a policy with the name provided. _options.GetPolicy will look into the policies statically defined inside AddAuthorization.
Since we don’t define our policies statically, the default implementation will not find them. We need to create our own:
using System;
using System.Threading.Tasks;
using Microsoft.AspNetCore.Authorization;
using Microsoft.Extensions.Options;

using static AuthUtils.PolicyProvider.PermissionAuthorizeAttribute;

namespace AuthUtils.PolicyProvider
{
    public class PermissionAuthorizationPolicyProvider : DefaultAuthorizationPolicyProvider
    {
        public PermissionAuthorizationPolicyProvider(
            IOptions<AuthorizationOptions> options) : base(options) { }

        public override async Task<AuthorizationPolicy?> GetPolicyAsync(
            string policyName)
        {
            if (!policyName.StartsWith(PolicyPrefix, StringComparison.OrdinalIgnoreCase))
                return await base.GetPolicyAsync(policyName);

            // Will extract the Operator AND/OR enum from the string
            PermissionOperator @operator = GetOperatorFromPolicy(policyName);

            // Will extract the permissions from the string (Create, Update..)
            string[] permissions = GetPermissionsFromPolicy(policyName);

            // Here we create the instance of our requirement
            var requirement = new PermissionRequirement(@operator, permissions);

            // Now we use the builder to create a policy, adding our requirement
            return new AuthorizationPolicyBuilder()
                .AddRequirements(requirement).Build();
        }
    }
}
Now, imagine that we have a policyName of PERMISSION_2_Create_Update:
1 - We inherit from the default implementation so we don’t have to reinvent the wheel
2 - We override the method I mentioned above. The first thing we do is check if the policyName starts with our defined prefix PERMISSION. If it doesn’t, we just fall back to the original method, loading from the static policies
3 - Then we create an instance of our PermissionRequirement. For that, we need the operator + list of permissions. I have helper methods to extract that from our policyName string.
4 - Finally we use the builder to create and return a policy containing our requirement!
The important part here, and there was a hint in the default implementation is that: given a policy name, the provider must always return the same policy. So given a policy name of PERMISSION_2_Create_Update, it will always return the same policy with the same requirements inside.
That is why we did all that “stringyfication” of our operator and permissions inside our attribute. All so it could be passed to our custom policy provider and used to construct dynamic policies/requirements.
The last thing now is to register things and we are done.
Registering our custom types:
We have all the pieces. Now we only need to register them so the framework can pick them up. In ConfigureServices we need to:
services.AddAuthorization(options =>
{
    // One static policy - All users must be authenticated
    options.DefaultPolicy = new AuthorizationPolicyBuilder(JwtBearerDefaults.AuthenticationScheme)
        .RequireAuthenticatedUser()
        .Build();

    // A static policy from our previous post. This still works!
    options.AddPolicy("Over18YearsOld", policy => policy.RequireAssertion(context =>
        context.User.HasClaim(c =>
            (c.Type == "DateOfBirth" && DateTime.Now.Year - DateTime.Parse(c.Value).Year >= 18)
        )));
});

// Register our custom Authorization handler
services.AddSingleton<IAuthorizationHandler, PermissionHandler>();

// Overrides the DefaultAuthorizationPolicyProvider with our own
services.AddSingleton<IAuthorizationPolicyProvider, PermissionAuthorizationPolicyProvider>();
That’s it. Now we can start adding permissions to our endpoints!
[PermissionAuthorize(Permissions.Read)]
[HttpGet]
public IActionResult Get()
{
    return Ok("We've got products!");
}

[PermissionAuthorize(PermissionOperator.And, Permissions.Update, Permissions.Read)]
[HttpPut]
public IActionResult Update()
{
    return Ok("It's good to change things sometimes!");
}
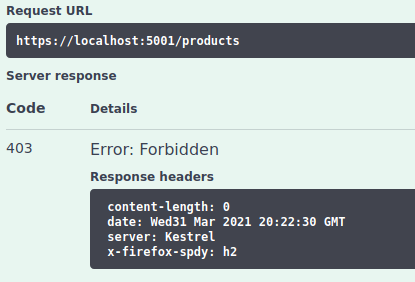
If we try to send a request without having the necessary permissions we get now a 403 - Forbidden as expected:
Conclusion
Back in the first post of the series we saw how to create a custom ClaimsIdentity that contained all the user’s permissions as Claim. In the second post, I took you on a deep dive into the types and architecture of authorization in ASP.NET Core. These two established the foundation for us.
In this post, we came full circle. We created a powerful, yet simple structure (only 4 new files!) that can be used to authorize your APIs. You saw how to create your own Requirement, AuthorizatioHandler, AuthorizeAttribute and finally the PolicyProvider.
With this approach, you can achieve very granular levels of authorization in your endpoints, without sacrificing simplicity. We don’t need to define manual policies anymore. We simply use the good old [Authorize] attribute, add permissions to it, and all works.
This is what I like the most about this solution. At first sight, it might seem like a lot, but the core of it is not that complicated. Once it is done you can just focus on building your API and being productive. The highlights for me are:
- Protecting endpoints is super easy
[PermissionAuthorize(Permissions.Read)]. - Other developers in the team don’t need to know about all the inner details (would be nice but not required)
- It’s very clear to see what permissions are required to access an endpoint
- We are not derailing and doing a complete custom thing. We are simply taking advantage of the framework’s flexibility and good API design
- It is completely testable and easy to see if your endpoints have the expected permissions
As usual, I have all this on GitHub. You can debug the integration test (spoiler alert!) I have for the ProductsController GET method. Put a breakpoint on the PermissionHandler and PermissionAuthorizationPolicyProvider to see things in action.
You can also run the API and test with Swagger. alice should have permission to access all endpoints, while bob can only access one. The swagger UI also has some documentation to help you.
Coming up next, I’ll show how to write integration tests for endpoints that are protected with our permissions.
Thanks for reading and I hope this was useful to you. Share with your .NET friends 😉