
This post is the first in a series about Authorization in ASP.NET Core. I’ll guide you through a series of approaches you can use to implement authorization in your ASP.NET Core APIs, focusing on advanced/real-world scenarios. Here’s a sneak peek for what I plan to show you:
- Where to store and resolve authorization-like data
- How to protect your API endpoints using permission-based authorization using the built-in types in the framework
- Reduce duplication and make things smarter by implementing a custom Authentication Handler.
- Mocking authentication/authorization during your integration tests
In this first post, I’ll demonstrate how can we use a middleware to build a ClaimsIdentity which contains all the permissions of the logged-in user. This is the foundation for the next posts where we will use the permissions to authorize the endpoints. I’ll also talk a bit about JWT tokens and if it’s a good idea to include authorization-related claims in them.
Note: The words
AuthenticationandAuthorizationare very similar and long to type, so I’ll refer to them in the post using their abbreviations:authnandauthz. It’s also common to see these abbreviations when researching around this topic.
TL;DR (show me the code)
Using a middleware to build a ClaimsIdentity containing all the user permissions read from the database. No authz data present in the JWT token.
The code on GitHub - PermissionsMiddleware.cs.
You can check this branch to see the repo in the state when this post was published.
Should I include “authz like” claims in my JWT Tokens?
Short answer: Probably not.
Long version: JWT authn is very common these days and also relatively easy to implement if you already have a security token service in place (STS, E.g. Identity Server). When talking about this topic, very often there’s some confusion between Authentication and Authorization, so let’s clear that a bit:
Authentication (authn) is the process of validating that a user is, in fact, who they claim to be. Authorization (authz) is the process of validating what the user is allowed to do in the system. Follow up this article if you want to dig more into this.
In token-based authn, the user gets a token which is the proof that they are who they claim to be (assuming the STS is doing its job well). Inside the token, you can find things like the user e-mail, their names, some id (sub), and more. But here is where things get a bit complicated though.
Basically, with a JWT token, you have everything you need 1. to process and authenticate the request, no need to communicate with any other service. This is, of course, very convenient, and it’s mostly the reason why it’s common to see authz-like data in the token. Take this token for example:
{
  "sub": "abc-123",
  "name": "John",
  "role": "developer",
  "exp": "1606595460",
}
See the role claim there? That is what we could identify as authorization data. Other examples might be individual permissions like: Create and Delete. So you might be asking yourself now: why is this not recommended?
Why not include authz data in JWT tokens
Size: a Token takes space like everything. If we add authz claims there, it could easily get big and cause all sorts of problems. One example is that JWT tokens are sent in HTTP headers and some servers have limits on the size.
Context: Each app has its requirements: As we saw, a token proves the user identity. The same token could be used to communicate with different applications. If we have authz claims in the token it might make sense for one app, but not for the other. The context in which the token is used might be different, but the user behind it is the same.
Security: Permissions can change quickly but tokens live for a while (usually 1 hour): If we put authz data in the token, we are risking letting the user access things that they shouldn’t. A common example is: Imagine someone is fired and they have a token with
sys_adminpermission which is valid for one hour. They could do anything with it in the system. Not very secure, I’d say 😅.
Ok - so hopefully that cleared things a bit and we know why it’s not a good idea to store authz data in JWT tokens. Let’s move on!
Where should I put my authz data then?
Short answer: As close as possible to your app. See the next session for an example.
Long answer:
We discussed above the word Context and it’s a very important word in this topic. Permissions/Roles, etc should be as close as possible to each application. It’s part of the domain of your app.
The app should know how to authorize things, so it’s only logical that the permission/role “lookup” for the individual user happens in the context of the app, not someplace else.
Take this example: You probably used an app that offered an option to sign in with Google or Facebook. Do you think Facebook/Google or any other OpenId/OAuth provider will know (or care) about your app’s authorization? I don’t think so. Makes no sense, right?
“app” here is a generic term. It could be your API, a process, a mobile app or a website. It doesn’t matter. The concept is still the same for all.
So, where should we put the authorization data? As close as possible to our app!
Simple model for authorization
We will be using a simple model to keep things straightforward, yet you can achieve a lot. Plus, you can extend it to accommodate more complex scenarios. The entities below are the foundation for the authorization of our API.
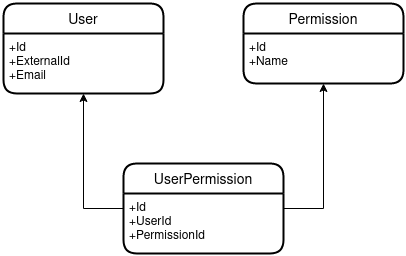
The idea is that our API has the concept of Users, Permissions, and the User permissions.
- User: The users in the system
- Permission: All the permissions present in the system. Here you can define the granularity you want
- UserPermission: The mapping which tells us what permissions a given user has
This post assumes the users are created and their permissions are configured in the system. Since this can be done in several ways it’s not the focus of this series.
Let’s see now how these entities are used.
Building a permissions identity
With the entities in place, we have all we need to create the middleware that will construct the ClaimsIdentity. But first, let me explain briefly what a ClaimsIdentity is. (if you know already, you can skip to the next session).
Claims identity - what??
In ASP.NET we have the famous HttpContext. The HttpContext is where we can find everything related to the request/response, including, of course, the logged-in user in the property User (type of ClaimsPrincipal).
In this series we’ll be using an API that is protected by JWT Bearer authentication. By configuring JWT Bearer authentication, the framework does all the work of validating the incoming JWT tokens for us.
The token validation happens in the JwtBearerHandler. If the token is valid, a ClaimsPrincipal is created and added to the context. The principal contains a lot of information, but the relevant part for us here is the Claims list property. In the claims list we will find all the data that was in the JWT token (email, name, etc).
Reading the Claims property in the ClaimsPrincipal will ultimately iterate through all the ClaimsIdentity, producing a “flat” list with all the Claims combined. This is the important part for us. We will create a new ClaimsIdentity that will contain all the user permissions as Claims.
You can see it like a 1:N relationship between a ClaimsPrincipal and ClaimsIdentity. The principal can have many identities and that’s exactly what we will be doing next.
Don’t feel bad if all this seems complicated. Hopefully, the next section will clear things up.
The permissions middleware
The goal of our middleware is to create a ClaimsIdentity containing all the user permissions as Claim. With this built and added to the HttpContext we can use the built-in policy-based authorization the ASP.NET Core framework gives us.
If you look closer to the source code for ClaimsPrincipal we can see that the Claims is an IEnumerable and its getter just iterates through all the ClaimsIdentity claims, and that is also an IEnumerable with no setter. All this means we can’t add new Claims to identity after it’s created. Immutability ftw!
Another benefit from this design is Separation of concerns. Having a separate identity to hold the permissions gives us a clear separation between their identity (who they are) and their permissions (what they can do).
I think it’s enough talking. Let’s see the code:
using AuthUtils;
using Microsoft.AspNetCore.Http;
using Microsoft.Extensions.Logging;
using System.Threading.Tasks;

namespace API.Authorization
{
    public class PermissionsMiddleware
    {
        private readonly RequestDelegate _next;
        private readonly ILogger<PermissionsMiddleware> _logger;

        public PermissionsMiddleware(
            RequestDelegate next,
            ILogger<PermissionsMiddleware> logger)
        {
            _next = next;
            _logger = logger;
        }

        public async Task InvokeAsync(
            HttpContext context, IUserPermissionService permissionService)
        {
            // 1 - if the request is not authenticated, nothing to do
            if (context.User.Identity == null || !context.User.Identity.IsAuthenticated)
            {
                await _next(context);
                return;
            }

            var cancellationToken = context.RequestAborted;

            // 2. The 'sub' claim is how we find the user in our system
            var userSub = context.User.FindFirst(StandardJwtClaimTypes.Subject)?.Value;
            if (string.IsNullOrEmpty(userSub))
            {
                await context.WriteAccessDeniedResponse(
                  "User 'sub' claim is required",
                  cancellationToken: cancellationToken);
                return;
            }

            // 3 - Now we try to get the user permissions (as ClaimsIdentity)
            var permissionsIdentity = await permissionService
                .GetUserPermissionsIdentity(userSub, cancellationToken);
            if (permissionsIdentity == null)
            {
                _logger.LogWarning("User {sub} does not have permissions", userSub);

                await context.WriteAccessDeniedResponse(cancellationToken: cancellationToken);
                return;
            }

            // 4 - User has permissions
            // so we add the extra identity to the ClaimsPrincipal
            context.User.AddIdentity(permissionsIdentity);
            await _next(context);
        }
    }
}
Let’s break it down:
- If the request is not authenticated there’s nothing we can do, so just continue.
The request can be unauthenticated. For example, if you have a Swagger UI for your API. When you first browse it you are not logged in.
- Try to find the
subclaim in theClaimslist we talked before. Thesubis used here to find the user in ourUserstable. If it’s not there, we return a403status.
I used the
subto find the user here, but you can use other values in your app.
With the
subin hand, we then join our tablesUsers, Permissions, UserPermissionsto find the user permissions. If we find any, aClaimsIdentityis built by theGetUserPermissionsIdentitymethod I created. All the permissions are nowClaimsinside.If we reach this far, the user has at least 1 permission. So we add the extra
ClaimsIdentityto theClaimsPrincipal, using the AddIdentity method.
Let’s test it!
Given this data in our database
To keep things easy to read, I used
intshere. In the GitHub repo you’ll seeGuids.
Permissions
| Id | Name |
|---|---|
| 1 | Create |
| 2 | Update |
| 3 | Delete |
Users
| Id | ExternalId | |
|---|---|---|
| 1 | 88421113 | bobsmith@email.com |
UserPermissions
| Id | UserId | PermissionId |
|---|---|---|
| 1 | 1 | 1 |
| 2 | 1 | 2 |
And a controller with the following code:
using System.Linq;
using Microsoft.AspNetCore.Authorization;
using Microsoft.AspNetCore.Mvc;

namespace API.Controllers
{
    [Authorize]
    [ApiController]
    [Route("users")]
    public class UserController : ControllerBase
    {
        [HttpGet("me")]
        public IActionResult Get()
        {
            // return all the user claims in all identities
            return Ok(User.Claims.Select(c => new {c.Type, c.Value}));
        }
    }
}
We get this response: (some values were removed for brevity)
[
  {
    "type": "sub",
    "value": "88421113"
  },
  {
    "type": "name",
    "value": "Bob Smith"
  },
  {
    "type": "email",
    "value": "BobSmith@email.com"
  },
  {
    "type": "permissions",
    "value": "Update"
  },
  {
    "type": "permissions",
    "value": "Create"
  }
]
See the last two permissions values: Create and Update? Those were added by our middleware! Cool, huh?
You can also check the integration I created. I’ll explain testing in later posts but it’s a good point to debug and see how things work.
Conclusion
We started the post by discussing the differences between Authentication & Authorization and why it’s considered a bad idea to include authorization-like data in JWT tokens.
Next, I showed you a simple model for permission-based authorization, and a custom middleware responsible for creating a ClaimsIdentity containing all the user permissions.
Coming up next, we’ll see how we can use the built-in policy authorization in ASP.NET Core to protect our endpoints with the permissions we prepared in this post.
Coming up next, I’ll take you on a deep dive into the waters of policy-based authorization in ASP.NET Core.
Some of the topics here might be new to you (or not so clear?), so I encourage you to clone the project on GitHub and debug it to see how things work. The most important part for this post is the Middleware: PermissionsMiddleware.cs. Pay attention to where we fetch the permissions. Inspect the context.User property to see all the stuff inside.
Check the README.md for instructions on how to run the project locally* 😉
See you next time. Stay safe! ✋
Photo by Dimitri Houtteman on Unsplash
You app still needs to fetch the public keys from the STS to validate the signature of the tokens. Libraries do that for you in the background so you don’t have to worry. In some other cases you might need/want to validate the token everytime. See Reference Tokens ↩︎