
This is the second post in the Authorization in ASP.NET Core series.
Part 1: Using a middleware to build a permission-based identity in ASP.NET Core
Part 2: Deep dive into policy-based authorization in ASP.NET Core (this post)
Part 3: Protecting your API endpoints with dynamic policies in ASP.NET Core
Part 4: Adding integration tests for permission-protected API endpoints in ASP.NET Core
In the previous post, we set the foundation by creating a ClaimsIdentity containing all the logged-in user permissions with the help of a custom middleware.
Before we start using the permissions we built in the last post, I believe it makes sense to review the authorization options the framework provides us and understand how things work under the hood.
So, in this post, we’ll start by reviewing the “out-of-the-box” authorization options in ASP.NET Core. Next, I’ll take you on a deep dive on the core components that, together, make up the Policy-based authorization in ASP.NET Core.
Note: My original intention with this post was to show you how to create dynamic policies by using a custom policy provider. But as I was writing it, I found the need to step back a little and go through the core types/concepts first. It’s a setback from the original plan, but I believe it will pay off.
TL;DR
In this post, I dug deep into the classes/types/services that compose policy-based authorization in ASP.NET Core. I showed each authorization option starting from the most basic and landed on examining step-by-step the work done to authorize a request.
If you are just interested in the deep-dive, skip to the Tying everything together section.
Authorization in ASP.NET Core
ASP.NET Core has several built-in options for authorizing our APIs. They vary in level of complexity/requirements.
Everything starts with the famous AddAuthorization and UseAuthorization methods we see often in ConfigureServices and Configure, all inside our Startup.cs. Let’s briefly look at them:
AddAuthorization and UseAuthorization: What for?
ConfigureServices:
Mostly everything we do inside ConfigureServices has to do with dependency injection. There we have the opportunity to register all the things we will be using across our application via DI. So, what does it mean to call AddAuthorization?
Calling AddAuthorization() will end up calling AddAuthorizationCore. This method will add to DI all the core and default implementations of several interfaces that comprise the authorization system in ASP.NET Core. We’ll take a closer look at them later on this post.
Configure
Inside Configure is where we configure the pipeline of our application (AKA middleware). By using UseAuthorization() we are effectively adding the AuthorizationMiddleware to the pipeline. (We’ll also talk about it later).
The most important thing from Configure is order matters. Why so, you ask?
When a request arrives, each middleware is invoked in the order they were added inside Configure. When the request is returning, it then passes back again in reverse (stack). The official docs explain it way better than me, so definitely check it out: Middleware order
With this information, it should make more sense why our Configure method looked like this in the last post:
// the rest is omitted for brevity
app.UseAuthentication();
app.UseMiddleware<PermissionsMiddleware>(); // our custom permission middleware
app.UseAuthorization();
Because our PermissionsMiddleware needs the logged-in user, it has to be added after UseAuthentication. If not, we wouldn’t have the user inside our middleware as authentication would happen later. Similarly, we can’t add UseAuthorization before any of those for similar reasons.
Simple authorization
The simplest way you can authorize your endpoints is by using the [Authorize] attribute. In its basic form, it enforces the request to be at least authenticated. For example: In an API configured to use Bearer token authentication if a request arrives without the token in the header (or an invalid one), it will fail with a 401 Unauthorized.
How does this work: Calling AddAuthorization() will register the services we saw earlier. One of them is the AuthorizationOptions which contains a default/fallback policy. If no policy for the endpoint is found, the default one is used in this simple authorization case.
Summary:
- Pros: It’s simple (if you only need to ensure the request is authenticated)
- Cons: Pretty much only covers the scenario above.
Read more on the official docs: Simple authorization in ASP.NET Core.
Role-based authorization
The next way we can authorize our endpoints is by using role-based authorization. With role-based, we still use the [Authorize] attribute, but we specify which role(s) are required.
In the last post, we created our ClaimsIdentity containing claims with type: permission and the values being the actual permission. With role-based authorization the process is the same. Instead of using permission as the claim type, if we changed it to role we would have something like this:
// rest omitted for brevity
  {
    "type": "role", // -> changed type to role
    "value": "Manager"
  }
Then we can use the Authorize attribute in our endpoint to allow access only for users in the Manager role:
[HttpGet("secret")]
[Authorize(Roles = "Manager")]
public IActionResult GetSecretData()
{
    return Ok("This is secret data - For managers only!");
}
Again, how this work by just adding the attribute? The AuthorizationMiddleware is invoked and it obtains the endpoint metadata, e.g our Authorize attribute. The middleware then gets a policy by calling the CombineAsync static method in the AuthorizationPolicy class. (Don’t worry too much, we’ll see this in more detail later).
Tip: Follow the link to the source code above to see how the
Rolestring is extracted and how the policy is created.
With this, our secret endpoint can only be accessed by users that are in the role Manager.
Summary:
- Pros: Also simple. If you work with roles already (or intend to, maybe with ASP.NET Identity) this would be a no-brainer.
- Cons: Not granular enough depending on your use case. Maybe you want only some users in a role to access an endpoint. You would need to create another role just for this case, potentially ending up with a lot of them.
Read more on the official docs: Role-based authorization in ASP.NET Core.
Claims-based authorization
In claims-based authorization, we still use the [Authorize] attribute. The difference now is that we provide a Policy name/string to it. The policy is statically configured and, at the minimum, it verifies if the logged-in user has a claim of the required type. Optionally it can also check the claim’s value.
For example: Let’s say you have a store that sells alcoholic beverages. In many countries, it’s common to allow selling alcoholic beverages to people only above a certain age.
Info: This example is pretty much similar to what they show in the official docs.
Transporting this requirement to claims-based authorization: We need a claim of type DateOfBirth with its value being the person’s birth date. With this information, we can decide if we can sell or not to this person. In code this means:
// Startup.cs
services.AddAuthorization(options =>
{
    options.AddPolicy("Over18YearsOld", policy => policy.RequireAssertion(context =>
        context.User.HasClaim(c =>
            c.Type == "DateOfBirth" &&
            // some custom function to calculate the years
            DiffInYears(DateTime.Today, DateTime.Parse(c.Value)) >= 18
        )));
})

// controller
[HttpGet("cannot-buy-this")]
[Authorize(Policy = "Over18YearsOld")]
public IActionResult GetAlhocolicBeverage()
{
    return Ok("Bob is enjoying some whisky now!");
}
How does this work? Pretty much the same as in role-based authorization. The AuthorizationMiddleware gets invoked and it obtains the endpoint metadata, e.g our Authorize attribute. But this time, the middleware gets a policy using the name we provided in the attribute, instead of the role.
With this, our secret endpoint can only be accessed by users that have the DateOfBirth claim AND are 18+ years old.
Summary:
Pros: More powerful than roles. With the
RequireAssertionfunction you can do a lot and achieve more granular levels of authorization.Cons: IMHO only checking if a claim exists in the Identity is pretty much useless. To make sense of it, you also need to check the value (like we did in the example). That requires you to write the code to check it. That’s not going to scale well even with just a handful of policies.
Read more on the official docs: Claims-based authorization in ASP.NET Core.
Quick recap
At this point, we reviewed the “out-of-the-box” authorization options in ASP.NET Core. For me, the key thing about them is that they are simple to use. I mentioned a lot of code and this and that, but to use it, you only need the [Authorize] attribute.
You don’t need to know which class calls what and where a policy gets created. You add the attribute, and the framework does all the rest, hiding all that complexity from us.
But: When you need to achieve more complex authorization requirements, my experience is that they are not enough.
In the next section, I want to dig deeper into things with you. It might seem unnecessary, but it’s crucial for understanding what we’ll be doing in the following posts on the series.
It’s also an interesting exercise (at least I think so!) to look into the framework code and understand how things work. It gives you much more confidence in building things.
So let’s talk about policies, shall we?
Policy based authorization
Everything related to authorization in ASP.NET Core orbits around Policies. All the options we discussed so far use the same base types and concepts. In the end, a policy is always involved. Be either by us creating it or the framework doing it for us. To understand how everything works together (and later how we can do more complex things with it), we need to dig deeper.
The following are the most relevant types involved in the whole process of authorizing a request:
- AuthorizationPolicy
- Requirements (
IAuthorizationRequirement) - Authorization Handlers (
IAuthorizationHandler) - DefaultAuthorizationService
- AuthorizationMiddleware
- PolicyEvaluator
It’s a lot of stuff. Let’s break it down and start with the simpler ones.
Policies, requirements and handlers
In the last section, we explicitly added a policy Over18YearsOld and configured how it would be evaluated using the RequireAssertion. We also saw an example with role-based authorization, but in that case, a policy was created implicitly by the framework.
Both approaches use a AuthorizationPolicy, IAuthorizationRequirement and a IAuthorizationHandler.
Here is a diagram I made as an attempt to show how these three relate to each other
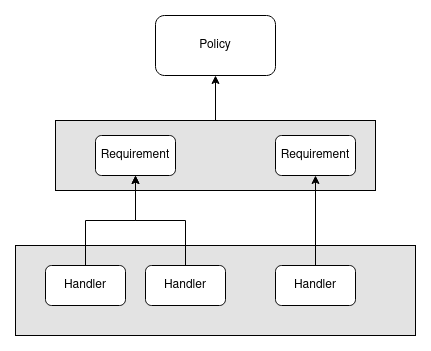
IAuthorizationRequirement
A requirement is something (a class/type) a policy and handler(s) can use to authorize the request. A requirement can also contain data.
For example: We could create a CanBuyAlcoholicDrinkRequirement which would contain the minimum age required to buy alcoholic beverages as a property. Requirements must implement the IAuthorizationRequirement marker interface. You can create as many requirements as you want in your app.
AuthorizationPolicy
A policy contains one or more requirements. In the case above, we added a requirement via the RequireAssertion method. In the end, calling it will add an AssertionRequirement to the policy for us.
Another important point about policies is that they must have a name. The policy name is what the framework uses to locate them later.
IAuthorizationHandler
So far, we know: Policies have requirements. But where are those requirements checked? Where do I put my authorization logic? The answer is Handlers!
We create Handlers defining which requirement type it will handle (as the generic arg <>). Following the CanBuyAlcoholicDrinkRequirement above, we would have a handler like so:
public class BuyAlcoholicDrinkHandler : AuthorizationHandler<CanBuyAlcoholicDrinkRequirement>
{
    protected override Task HandleRequirementAsync(
        AuthorizationHandlerContext context,
        CanBuyAlcoholicDrinkRequirement requirement)
    {
        // here we would:
        // 1 - check if the user has the DateOfBirth claim
        // 2 - Check if the user has the minimum required age, using the requirement
    }
}
We can have more than one handler for the same requirement. This is explained better in the docs: Why would I want multiple handlers for a requirement?.
The handler needs to implement/override the HandleRequirementAsync method. The method receives two parameters:
- The
AuthorizationHandlerContextwhich contains theUserand the requirements needed for the policy to succeed - The Requirement instance the handler handles
If our validation check is ok, the handler needs to call context.Succeed(requirement) passing the requirement instance it received as a param. By doing so, the requirement is removed from the AuthorizationHandlerContext.
If all requirements are fulfilled, the AuthorizationHandlerContext should have 0 requirements left in the end. That’s how the framework later checks to see if the request is authorized or not.
The handler can also call context.Fail() to guarantee failure, even if other requirement handlers succeed.
Another important thing about handlers is that you need to add your custom ones to DI. This is because they are later obtained by the DefaultAuthorizationService. If they are not registered, things will not work as expected. Like so:
services.AddSingleton<IAuthorizationHandler, BuyAlcoholicDrinkHandler>();
Tying everything together
Now that we understand better policies, requirements, and handlers, we need to see how they are used. The three “main” services involved in the authorization process are:
I’ll now lay out step-by-step what all these services do. Hang on, it’s going to be looooooong.
Everything starts in the
AuthorizationMiddleware. First, it finds the endpointThen it gets the endpoint’s authorization metadata (the
Authorizeattribute and its data)Then it tries to obtain the Policy by using the authorization data +
IAuthorizationPolicyProvider.The
CombineAsyncmethod in theAuthorizationPolicyis called. There it tries to find the policy by its name and by the role name. If nothing is found, it checks if it needs to return the default policy. (the case for just using the plainAuthorizeattribute)Back to the
AuthorizationMiddleware, it gets the PolicyEvaluator from DIIt invokes the AuthenticateAsync method in the evaluator. This is done to set the
ClaimsPrincipalto theUserproperty in the context.If we are still good, the middleware invokes the AuthorizeAsync in the
PolicyEvaluator.The
PolicyEvaluatorthen calls the AuthorizeAsync on theDefaultAuthorizationService.The
AuthorizeAsyncis an ext method insideAuthorizationServiceExtensions. In the end, it will call this overload AuthorizeAsync which receives the user and the policy requirements.Inside
AuthorizeAsyncan AuthorizationHandlerContext is createdThen it gets all the IAuthorizationHandlers from DI and start calling one by one passing the
AuthorizationHandlerContextEach
IAuthorizationHandleris invoked, and it does the work we described before, either callingSucceedorFailin theAuthorizationHandlerContext.Once all handlers are invoked, the
DefaultAuthorizationServicecalls the Evaluate method inside the DefaultAuthorizationEvaluator.The
DefaultAuthorizationEvaluatorreturns the appropriateAuthorizationResultdepending on properties set in theAuthorizationHandlerContextby the handlers.The
DefaultAuthorizationServicereturns the response to thePolicyEvaluatorwhich then returns either a success or forbid/challenge PolicyAuthorizationResult.The
PolicyAuthorizationResultis finally then passed toIAuthorizationMiddlewareResultHandler.
Phew! That was a lot wasn’t it? it. I tried many formats to describe the steps, but this was what made the most sense to me when I was trying to understand it. Hopefully, it makes sense to you as well.
Conclusion
Let’s recap what we learned in this post.
I started by explaining the purpose behind the AddAuthorization and UseAuthorization methods we often see in ASP.NET Core apps.
Next, I introduced the most common (I think?) authorization options in ASP.NET Core. We saw the basic usage of the [Authorize] attribute, then role-based with [Authorize(Roles = "Manager")] and finally claims-based [Authorize(Policy = "Over18YearsOld")].
In the end, we took a deep dive into all the moving parts that compose the architecture of policy-based authorization in ASP.NET Core. In this section, we saw what a request goes through inside the framework to determine if it’s authorized or not.
I know, it’s a lot to absorb. It took me some time to wrap my head around all of it, so by all means don’t feel bad if none of this makes sense immediately.
In my view, the best way to absorb it is by trying it out. Use the branch for this post on GitHub. Check out the UserController to see the types of authorization we discussed here (Swagger should tell you which user to use for each).
Another useful tip is to debug the framework code by using Source Link. Check out this post by Steve Gordon to see how: Debugging ASP.NET Core 2.0 Source Code
As I mentioned earlier, the original idea with this post was to show how to create policies dynamically by implementing a custom policy provider. But as I was writing it, I realized that there were so many concepts that I didn’t explain before, so I decided to write this deep dive instead. The goal was to give you a good understanding of how everything works, so later when building our custom stuff things are less convoluted.
If you feel lost by reading this, feel free to reach out to me on Twitter.
In the next post (now for real), we will use all the knowledge acquired here and build our custom policy provider, solving more complex authorization requirements you might face in your real-world apps.
See you next time!