
This is the third post in the Integration tests in ASP.NET Core series.
Part 1: Limitations of the EF Core in-memory database providers
Part 2: Using docker-compose for your ASP.NET + EF Core integration tests
Part 3: ASP.NET Core integration tests with docker-compose on Azure Pipelines (this post)
Part 4: ASP.NET Core integration tests with docker-compose on GitHub Actions
In the last post of the series we saw how to use SQL Server on Docker as the database for our integration tests during local development.
In this post, we’ll be continuing with the same code but I’ll demonstrate how we can run the tests using docker-compose on Azure Pipelines as part of our CI builds.
TL;DR
Go directly to the Azure Pipeline yaml
Quick recap on running the tests locally
Before starting with our Azure pipeline, let’s remember the steps to run the tests locally. This will help us design our yaml file for our CI build:
- Start the SQL Container
docker-compose upat the root of the repo - Run the tests
dotnet test
There’s a little caveat between the steps above. It takes a few seconds until the SQL Server container is ready to accept connections. We’ll ignore this in this post, but there are several strategies to work around in case you face this issue. One is to use scripts that will “wait” for the container to be ready. For example wait-for-it
Now that we know the steps, let’s re-create them on Azure Pipelines.
Creating our Azure Pipelines build
This is how our final pipeline yaml file looks like:
name: "$(Date:yyyy).$(Date:MM).$(Rev:r)"

trigger:
  batch: true
  branches:
    include:
    - main
    - feat/*
    - bugs/*
  paths:
    include:
    - src/*
    - tests/*
    - az-devops/*
    - BlogApp.sln
    - Directory.Build.props

pool:
  vmImage: ubuntu-16.04

variables:
  buildConfiguration: 'Release'
  appProjectDir: 'src/BlogApp.Api'

jobs:
- job:
  displayName: Build App
  steps:

  - task: DockerCompose@0
    displayName: Start dependencies (docker-compose)
    inputs:
      containerregistrytype: Container Registry
      dockerComposeFile: docker-compose.yml
      dockerComposeCommand: 'up -d'

  - task: UseDotNet@2
    displayName: Installing .NET SDK
    inputs:
      packageType: 'sdk'
      version: '3.1.x'

  - task: NuGetCommand@2
    displayName: Restore NuGet packages
    inputs:
      restoreSolution: BlogApp.sln
      includeNuGetOrg: true

  - task: DotNetCoreCLI@2
    displayName: Build
    inputs:
      command: build
      projects: $(appProjectDir)/BlogApp.Api.csproj
      arguments: '-c $(buildConfiguration) --no-restore'

  - task: DotNetCoreCLI@2
    displayName: Test
    inputs:
      command: test
      projects: 'tests/**/*.csproj'
      arguments: '-c $(buildConfiguration) --collect:"XPlat Code Coverage"'
The yaml pipeline can be quite daunting at first sight, but once you get the hang of it it’s not that bad. When I got started, this page YAML schema reference helped me a lot.
Let’s review the steps:
Trigger, pool and variables
The trigger section tells the pipelines to run the build for the included branches, when changes occur on the configured paths.
The pool section tells on which pool our jobs will run. In this case, I’m using the Microsoft-hosted pool and telling it to run my jobs using an ubuntu image.
In the variables section I just set the build configuration and the path to the API to avoid typing it multiple times along the tasks. Nothing special.
Jobs
We only have one job in our build. I recommend reading the page above to understand the hierarchy of things. For now, it’s enough to know that one job can have tasks.
Docker compose task
As we know, to run our tests we need to make sure we have our SQL Server running on Docker since our tests will expect a server on localhost,1433. For that, we use the DockerCompose@0 task.
We need to specify which container registry we want to use (containerregistrytype). The default is to use Azure ACR. Since the SQL Server image lives in the Docker public registry, we need to set the value to Container Registry. The link above has more details on it.
Then we just need to instruct it where the docker-compose file is and the command to execute. This is the same when running locally, docker-compose up -d (-d for detached, because we don’t want to block the terminal)
Restore, Build and Test
The rest of the tasks are relatively self-explanatory and don’t deviate much from the commands you would normally run if you use the .NET Core CLI. But let’s review them anyway:
First, we make sure we have the proper .NET Core SDK installed (
UseDotNet@2)Next, we restore the packages for the whole solution (
NuGetCommand@2) passing the.slnfile torestoreSolution.Then we use the
DotNetCoreCLI@2to issue commands against the .NET Core CLI. First starting withbuildpassing thecsprojof our APIFinally, we issue a
testcommand passing a glob pattern to find all projects inside thetestsfolder.
That’s it! Now every time you push something to any of the branches configured in the trigger section, a build will run and our tests using Docker will be executed. See here a build run example.
Creating the Pipeline on Azure DevOps
The next step is to save the yaml file above at the root of your repo. I usually put them into an az-devops folder, but you can place it anywhere you want and name it how you prefer. You need to commit and push it to be able to set up the pipeline on Azure DevOps. Follow the steps below:
Go to Pipelines > New Pipeline (top-right button)
In “Where is your code” select the Git provider you are using for your project
Select the git repository where you have your
.yamlfileIn “Configure your pipeline” select the option “Existing Azure Pipelines YAML”
In the right menu select the branch and the the
.yamlfile. (If you pushed the file to a different branch other than the default, you need to change it)Click on “Continue”
It shows a review of the file. Just click on Run to save and run the pipeline
The steps above expects that you already have a project and a connection to a Git provider (Azure Repos, GitHub or other) configured in your Azure DevOps organization.
You should have your brand new pipeline now! Hopefully passing 😅
Extras
If you got this far, I have some extra stuff for you. Read on!
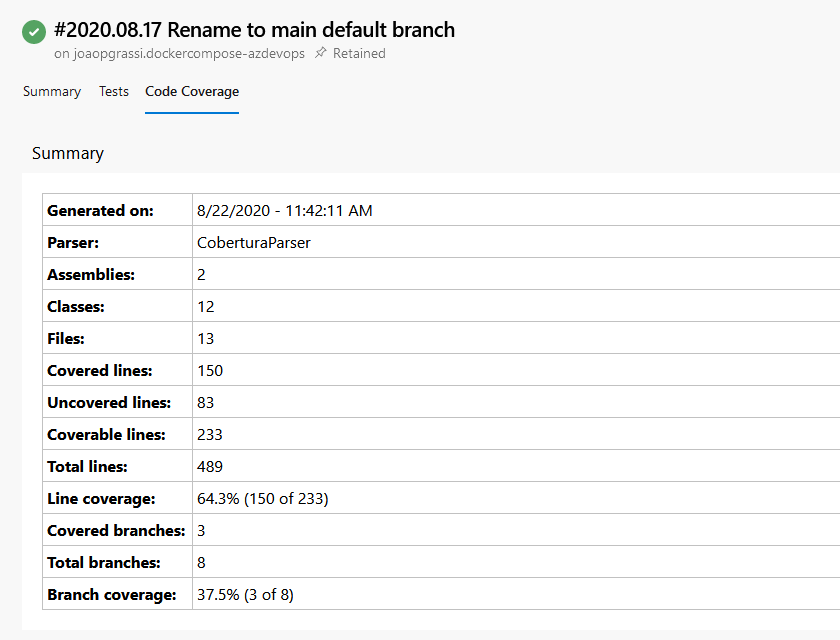
Code coverage
I tried to keep the pipeline above as simple as possible so it wouldn’t be too much to explain here. But if you head to the project on GitHub, you’ll see how I set up code coverage. That way you also have the coverage report as part of each build directly on Azure DevOps:
Build tasks
Another thing I’d like to discuss is the tasks in the build. What I showed here is roughly what I use for my projects, but there are so many other ways to do it.
I use the NuGet task (NuGetCommand@2) to restore the packages. I could use the .NET CLI and simple dotnet restore and that would work as well. I use the NuGet task mostly because I have private NuGet feeds and I ran into several problems on Azure DevOps using the CLI. So after a lot of try and error that is what worked for me.
The test task also builds the projects again which is not great. That is necessary because in the build task I only build the API. If I would run the tests with test --no-build then it would fail because the test project was never built. You can decide what to do in your own projects. Maybe building the .sln instead is good enough.
Summary
In this post, I showed you how we can reproduce our local test run using SQL Server on Docker on Azure Pipelines. We saw the yaml file and we went through all the tasks that define it.
As a closing consideration, I wanted to point out that there’s no silver bullet pipeline, and what I presented here is just one way to do it. You could instead just write a PowerShell or Bash script that would do the same steps and your yaml file would just run that.
In your real-world apps, you need to consider what’s best for your development flow and what your team is most comfortable with.
Coming up next we’ll see how to do the same using GitHub actions. Stay tuned and thanks for reading!